Every single knitted garment is created using just 2 basic stitches – the knit stitch and the purl stitch. In addition, you need to know how to start (cast on) a piece of work, and how to end (cast off or bind off).
Once these basics are mastered, everything else is just a variation on these stitches.
However, there are many effects that can be obtained using both texture and color and these will be covered at a later stage. For now just follow the links to find out how to make the basic knitting stitches.
Cast On
There are several ways to cast on, each giving a slightly different finish. Here I explain the one needle, thumb cast on.
For a slightly less stretchy edge and, to my mind, a neater finish, try the two needle cast on.
Cast Off
Making a neat finish is essential with a piece of knitting to give a good edge for sewing together or, in situations such as the neckband, the cast off edge is visible on the finished garment. Here I explain how to cast off.
Tip: If you are new to knitting, check out our 50 knitting tips for beginners here.
Making a Knit Stitch
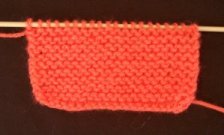
The Knit stitch is one of the fundamental building blocks of knitting. Once you have mastered the knit stitch you will be able to create scarves or hats using ‘garter’ stitch. Garter stitch is the name given to knitting where every single row is knitted.
Here I explain how to make the knit stitch. Click this link if you want to learn to knit continental style.
Making a Purl Stitch
The Purl stitch is the reverse of the knit stitch. That is to say that a knit stitch looks just like a purl on the reverse and a purl stitch looks just like a knit stitch on the reverse. This is the only other stitch you need to learn to be able to knit anything as everything else is just a variation on how to knit and how to purl.
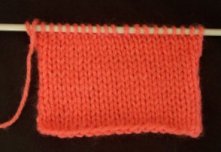
The picture shows ‘stocking stitch’ (or stockinette) which is where you knit one row and then purl the next row. The front of the fabric is smooth and looks like lots of v stitches while the back is rough and bumpy. From the front all the stitches appear to be knit stitches and from the back they all appear to be purl stitches.
Here I show you how to make a purl stitch. Click this link if you want to learn to knit continental style.
How to Knit Ribbing
Ribbing is where you knit and then purl in a regular sequence to make a stretchy hem or border. It is usually used at the cuffs and neckbands of jumpers for example.
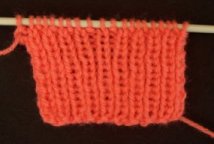
The first picture shows 1×1 ribbing, that is knit 1, purl 1, repeated across the width of the fabric.
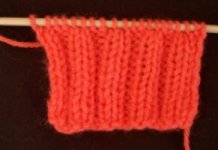
The second picture shows 2×2 ribbing which is knit 2, purl 2, again repeated across the whole width of the fabric.
Both these ribs give a nice springy, stretchy edge to the garment.
If you are left-handed you may be interested in finding out more about how to knit left-handed.
Knitting Increase Stitches
There are two ways of increasing stitches other than casting on. These are by knitting into the front and back of the next stitch or by ‘making one’. When you increase by knitting into the front and back of a stitch, you are left with a small bar across on the knit side of the fabric. This is barely visible, even with stocking stitch, but to increase invisibly, use Make One increasing. Here you can learn more.
Decreasing Stitches in Knitting
The following videos show two different ways of decreasing stitches for shaping. The slip one, knit one, pass slipped stitch over (skpsso in patterns) is used for a left slanting decrease, normally on the right edge of a garment while the knit two together (k2tog in patterns) is used for a right slanting decrease on the left edge. Read more here.
Left Handed Knitting
A friend of mine very kindly agreed to knit left handed for me to video for the website. Her hands are the knitting and purling videos that follow. Unfortunately I couldn’t use the footage of her casting on and casting off so I have done my best to learn to do both myself. If the casting on and casting off videos look a little clumsy it’s because I am a right handed knitter learning a new skill!
If you do decide to learn to knit left handed, it is vital to reverse pattern shapings and read the pattern charts from right to left rather than left to right.